Technical Guides
Heat Molding Process
HEAT MOLDABLE BOOT MODELS
- Hyper SKC
- Hyper CLC
- RPS
- RPC
- RPU
- Active T
- Hyper JRR
- Athena SKC
- Athena CLC
- Metis RPS
- Metic RPC
- Metus RPU
- Frøya T
- Athena JRR
Congratulations on your decision to purchase Madshus Cross Country Ski boots. The R&D team at Madshus believes we have created the finest blend of comfort and performance ever achieved in footwear for cross country skiing. Madshus boots are designed to fit well for the vast majority of people right out of the box. However, to get the most out of these boots we recommend that you heat mold them for a custom fit and even greater boot responsiveness.
Please follow the instructions below:
SUPPLIES:
- Hair dryer or ski boot liner heating stacks. (Do not use a microwave oven, conventional oven, or heat gun. It will damage the boots and void your warranty).
- Thin socks.
- An assistant to help make things easier.
BOOT PREPARATION:
- Unzip the lace cover and loosen the laces enough to remove the insole (footbed).
- Remove the footbed (removable insole) from the boot.
- Open boot fully.
HEATING THE BOOTS:
- It is recommended that you heat and mold the boots one at a time.
- If you are using ski boot liner heating stacks place the boot on the heat stack for a period of 10 minutes of heating time.
- If you are using a hair dryer, insert it into the open boot for 10 minutes.
- After 10 minutes the sides of the boot and ankle area should become noticeably flexible.
- The boot is now ready to be custom fit.
- If the boots are not flexible after 10 minutes then continue to heat them for an additional two minutes.
- DO NOT increase the temperature setting. Boots that have been damaged by excessive heating from any means (heat gun, oven, heating stacks etc.) are not covered under warranty.
MOLDING THE BOOTS:
- Insert the footbed (removable insole) into the boot.
- Put on a thin sock on the foot to be molded. Remove the hair dryer, or take boot off of the heating stack and put them on immediately.
- Warning - the metal eyelets, zipper handle, etc. will be HOT to the touch! Please be careful.
- Lace the boots until they are snug, but not as tight as one might ski in.
- Weight the boot (stand in the basic ski glide position with your knee over your toes) for about 5~10 minutes to allow the boots to cool and get firm. Your assistant should apply additional hand and finger pressure to important areas such as the heel, ankle under the cuff and sides of the arch on medial (arch side) and lateral (outside) sides for the best possible molding.
- When the boot has cooled and become stiffer and supportive (5-10 minutes) remove it and mold the other boot starting with step 2A above.
- When you have completed both boots, go skiing.
- It is possible to heat mold the boots more than once. Repeat the molding process until you have achieved the desired fit.
Note: Using a heat gun is not recommended by Madshus due to the risk of damaging synthetic boot materials from too high a setting on the heat gun or by prolonged heating in one area of the boot. Boots that have been damaged by excessive heating from any means (heat gun, oven, heating stacks, etc.) are not covered under warranty.
WHY LACES?
Madshus uses laces to provide the best, most customizable fit that does not loosen in use.
To achieve the best fit from your Madshus boots, try these lacing techniques.
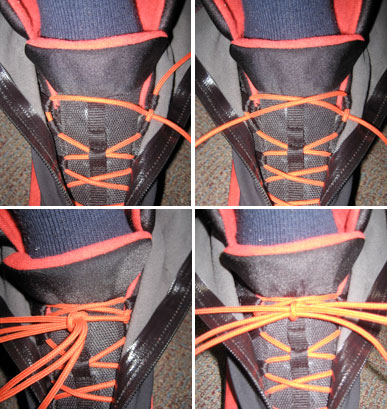
Increasing heel hold – Marathon lacing If you have a narrow heel, this lacing can help hold your foot more securely in the heel of your boot.
On the top two webbing loops:
- Lace straight up from one to the other instead of across.
- Then lace across and through the loop that is formed.
- Tie a regular knot at the top.
This loop creates a pulley-effect to create more heel hold.
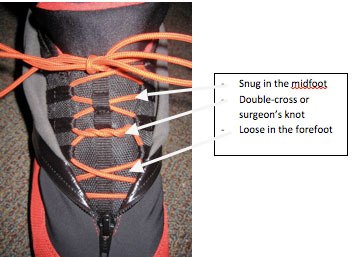
Different tightness in different places.
Do you want to have low pressure on your forefoot and a snug fit in the midfoot and rearfoot?
- Lace the forefoot to the desired tension.
- Cross the laces twice.
- Continue lacing.
- Tension the midfoot to the desired tension. The forefoot tension should not change.
Surfer's Knob - High, irritated point on top of instep
To avoid pressure on this spot, skip one crossing of the laces. Instead lace up from one webbing eyelet to the one directly above.
.jpg)
Sizing the Madshus Contour Race Strap:
Determining the correct strap size for your hand:
Use the following chart as a starting point:

When trying on a Madshus ski pole, adjust each part of the strap to achieve a proper fit. Adjust, in order:
- The webbing connecting the palm portion of the strap to the handle
- The webbing connecting the portion on the back of the hand to the handle
- The Velcro wrist strap
If these efforts are not successful, you may want to try a different size of strap.
Adjusting the Fit of the Contour Race Strap:
To ensure a proper fit, first adjust each of the straps that attach to the handle then tighten the wrist strap. Independently adjusting the webbing straps is necessary to correctly position the strap on the hand.

The portion along the back of the hand should be approximately 1cm away from the knuckles.

The molded thumb section should wrap around the muscular portion of the thumb.

The other molded section should wrap around the outside of the hand.

These two molded sections connect in the center of the palm of the hand. This connection and the sections of webbing connecting the strap to the handle should be positioned in the deepest part of the notch between the thumb and first finger.

Try adjusting the length of the webbing straps to achieve the fit described above. These adjustments are necessary to achieve optimal performance and comfort.
Biathlon Strap:
The Madshus Biathlon strap is tailored to fit your hand for comfortable skiing and fast entry and exit, regardless of your choice of gloves or mittens.
- The regular size works for Adults
- The Junior size works for children
HOW DO I SELECT THE CORRECT MADSHUS CLASSIC SKI

HOW DO I SELECT THE CORRECT MADSHUS SKATE SKI
